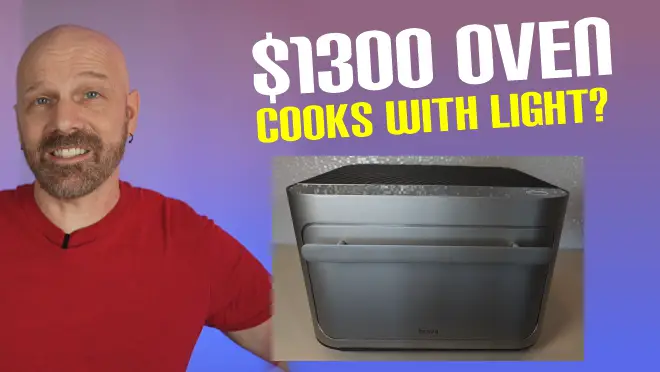
Brava is a high-tech countertop oven that cooks food with light. This self-described revolutionary cookware comes at a price, however. I’ve spent the past month testing it out and today I offer my review.
Where to Purchase
You can purchase the Brava from the official website or from Amazon. The price varies from $1300-$1700, depending on the package you choose. The least expensive package includes the oven, a metal tray, a glass tray, and the temperature sensor. More expensive packages include additional accessories. I opted for the least expensive package, although I did purchase an egg tray separately at a later date. That tray was $50 plus $15 shipping, for a total cost of $65.
Claims & Features
- Light technology delivers up to 900-degrees of heat in seconds.
- Uses coordinated pulses of light
- Cooks hotter, faster, and more precise than other ovens
- Oven is divided into 3 zones that can cook different foods right next to each other
- Integrated mobile app
- Dehydrate, air fry, rice cooker, and other modes
Brava Review
The advertising for Brava is compelling, claiming that it can cook food with light, and do so more quickly, more precisely, and more efficiently than traditional countertop ovens. It works by bathing food in pulses of focused light which is separated into three internal zones, allowing you to cook different types of foods right next to each other. But does it work?
Upon cracking open my Brava, I was met with a hefty metallic oven with a heavy door, color touch screen, and a couple of accessories (metal tray, glass tray, and temperature sensor). After the usual unboxing and perusing the instructions, I was ready to fire it up and start using it. The instructions indicate that it should be connected to a dedicated circuit because it pulls 1800 watts.
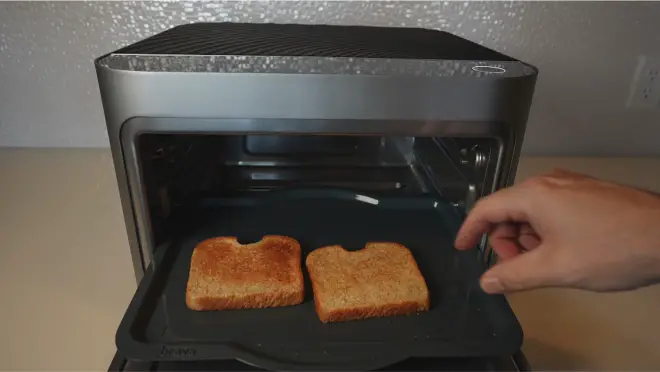
I wanted to start small and work my way up, so I decided that the simplest starting point would be a couple of slices of toast. I searched Brava’s touch screen for toast and several options appeared. I selected wheat bread, input the number of slices, and opted for a browning level of 3 out of 10. Each step is clearly marked and explained on the Brava’s screen, so there wasn’t anything confusing about the process, even upon the first use. After putting my toast in the middle of the metal tray (the middle is labeled Zone 2), I slid it into the unit and pressed the big green button to begin the process.
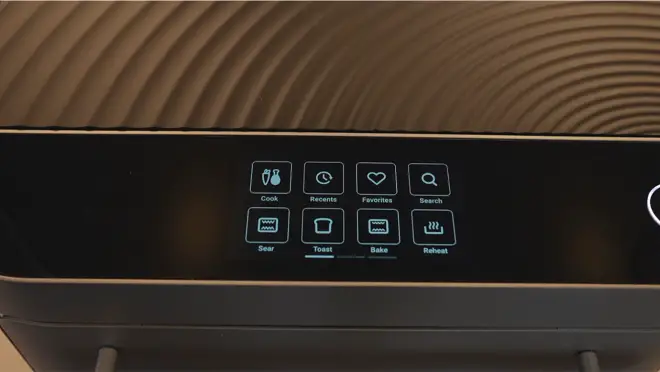
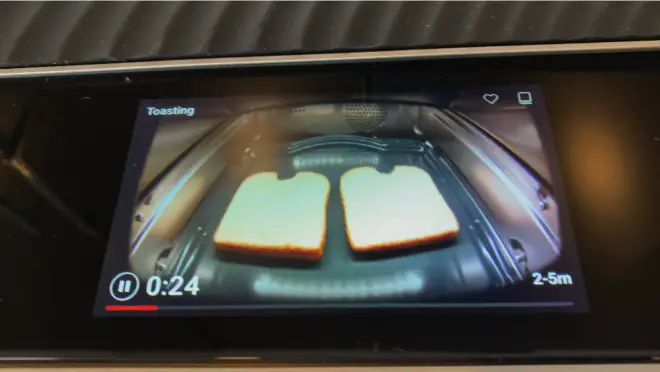
While food is cooking, an indicator bar and timer display the progress. Perhaps the most impressive feature is an internal camera which allows you to keep an eye on the food as it is being heated. This can also be viewed via the smartphone app, which essentially mimics the front panel of the Brava itself.
After a couple minutes, I had an indication that the toast was done. It turned out fine, although the side facing up was a bit browner than the side facing down. There were no indications to flip it, although that would have likely helped deliver a more even result.
Next up I wanted to try a couple of frozen waffles. Once again, I searched Brava’s panel for frozen waffles and there was an existing “recipe” which I used. After selecting two waffles, I was prompted to make any manual adjustments to the settings, then instructed to place the waffles on the pan, and insert it on the bottom shelf. There is a sort of “recap” screen before you begin cooking each recipe that gives you an overview of what you selected, what the settings are, and the approximate time it will take to cook. My waffles were finished after about 3.5 minutes. Once again, the face-up sides of the waffles were browner than the sides facing down, but they turned out fine overall.
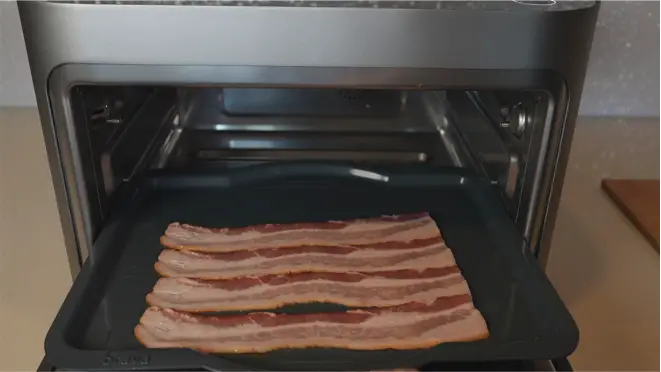
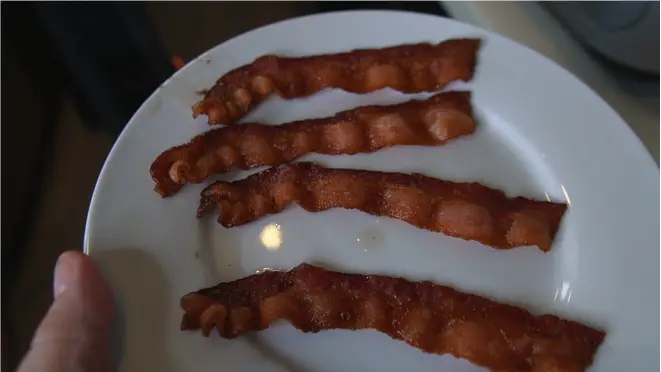
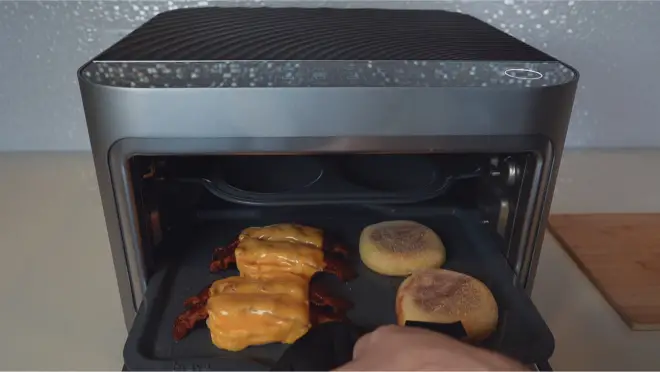
Now it was time to try a multi-ingredient recipe. I chose a breakfast sandwich recipe consisting of bacon, egg, cheese, and an English muffin. The recipe on the Brava called for cooked bacon, which I did first – using a bacon recipe within the unit. I selected 4 strips under the crispy setting, which took about 5 minutes. The bacon turned out perfectly, with only minimal splatter within the oven itself. Now it was time to build the sandwich. I stacked the bacon and cheese on one side of an English muffin and placed the buttered tops facing down. I then cracked two eggs into the egg tray and loaded both trays in the oven. After about 5 minutes, the cycle completed, and I removed the trays to assemble the sandwiches. The eggs were perfectly cooked, the cheese was melted but not oozing everywhere as I feared might happen, and the English muffin tops were slightly toasted. The final result was exactly as I had expected based on the recipe.
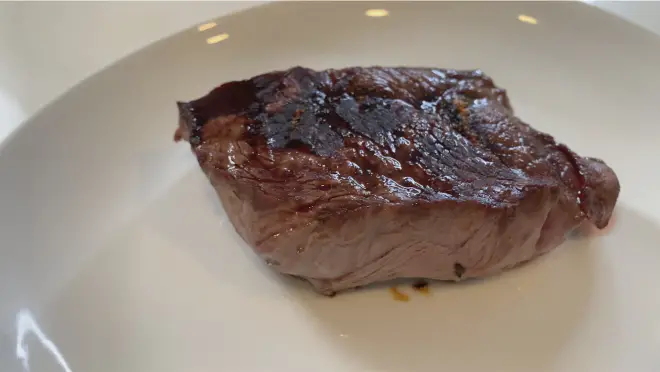
Next was the one recipe I had wanted to try since purchasing the Brava, and that was steak. Steak is one of those foods that is easy to overcook or undercook, so I wondered if it was indeed possible to cook a steak using only light. I was so skeptical that I bought two steaks – just in case the first test was a disaster.
I bought two top sirloin steaks – and there was an option for this type of steak in the Brava’s library. After selecting the cut and size, and inserting the TempSensor, I selected medium-rare among the five doneness choices. After that it was just a matter of sliding the tray into the Brava, connecting the temp sensor to the oven, and pressing start. I repeated the process with a second steak, this time choosing medium. Both steaks took around 10 minutes and turned out beautifully. There was a nice sear on the outside, while the steak remained tender and juicy on the inside. It would be difficult to take issue with the final results (although I’m sure there will be those on YouTube who will try).

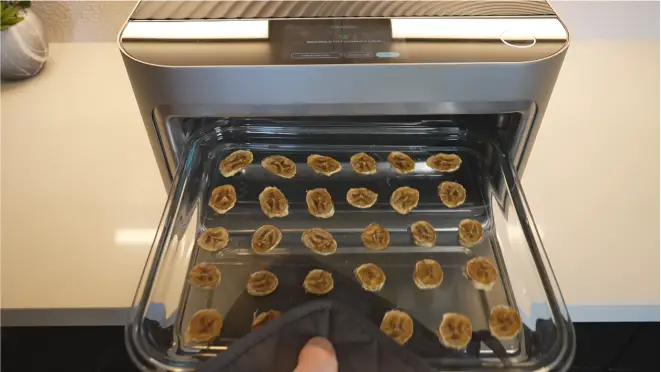
Although I did not test every feature for this review, I did do a couple of other quick tests, including dehydrated bananas, which went without a hitch. My only suggestion would be to coat the bananas in lemon juice to help lessen browning and minimize sticking to the glass tray. One tray of bananas at 135 degrees Fahrenheit took about 6 hours. I also tried preparing a frozen pizza using manual settings in the Bake mode, and that was a straightforward and simple process.
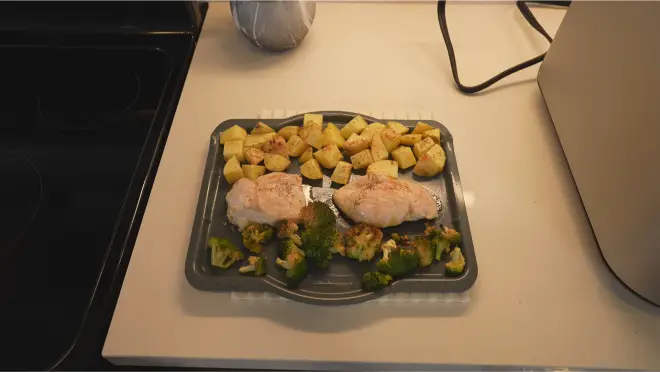
For my final test, I wanted to try a full meal using three ingredients, all on one tray. For that test, I opted for the “Chicken Breast with Broccoli and Potatoes” recipe found within the Brava. For this meal, broccoli would be cooked in Zone 1, chicken in Zone 2, and potatoes in Zone 3. After preparing all of the ingredients according to the recipe, I placed them on the metal tray and started the cooking process. The cooking cycle was complete after about 20 minutes, and all three ingredients of my meal were done at the same time. The chicken was properly cooked and juicy, the potatoes were not too hard or mushy, and the broccoli was lightly roasted.
TempSensor
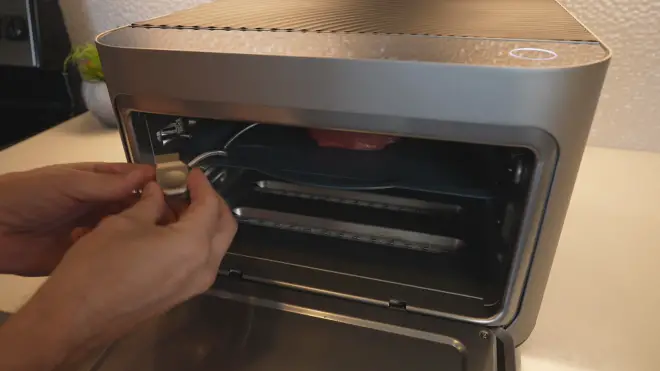
The TempSensor is probably the only feature on the Brava in which I feel has room for improvement. To use the TempSensor, you slide it into the meat horizontally, which allows the oven to keep tabs on the progress of your food. Functionally, the TempSensor does do its job of measuring temperature. Where I take issue is when putting the tray in or taking it out of the Brava while the TempSensor is connected. Connecting it after sliding the tray into place often pushes food on the tray around due to the metal cable bending in the tight space. Connecting it beforehand seems impossible, yet recipes on the Brava show the TempSensor being connected to the unit before sliding the tray into place. Once food is done, the TempSensor must be disconnected from the Brava before the tray can be removed, and it is hot. This requires a potholder that often bumps into the left side of the tray’s Zone 1.
The TempSensor also serves as a sort of measuring stick in which you tell the Brava how thick your food. There are markings along the side which you use to measure your foods thickness, which the Brava often requests during the setup process.
Conclusion
Overall, the Brava does feel like a logical step in the evolution of modern cooking appliances. Besides the awkwardness of the TempSensor, my only real complaint is the cost. $1300-$1700 is simply out of reach for the average consumer for a countertop oven. It will be hard for the typical family to pay this much for a countertop oven, when common full-sized ovens rarely approach this price range. I do think, however, that those who purchase the Brava will grow to love it quickly. Hopefully over time the price can come down sufficiently to be more affordable for more people.
Have you used Brava or something like it? Tell me what you think in the comments below.
How energy-efficient is the bravo, compared to using your regular stove?
They claim it is more energy efficient than a conventional oven. I can’t vouch for that claim, though. I do know they want it on a dedicated circuit and that it is 1800 watts.
https://support.brava.com/hc/en-us/articles/1500013113881-How-Energy-Efficient-Is-the-Brava-
For that price most people would buy a brand new oven/stove in which you can actually entertain with and use every day. To me this is just another item that takes up room on your counter tops. The price is unrealistic even if you have money to burn.
Dude this thing looks awesome. But I’m not sure i can afford it. This review is so spot on. I can’t stand cleaning pots and use pans for everything. I would actually buy groceries like a normal person lol I can’t stand how long it takes for my apartments oven to heat and cool. I want to make breakfast sandwiches and pizza and steak all with the same appliance and i don’t even live in a rv. I have the pots and oven and whatever. Weird times were living in.
It works great, but man is it expensive. I totally hear where you’re coming from! Hopefully they can drop the price over time to make it more affordable!
Do you have a referral code for this oven?
Try this: https://share.brava.com/James2